| Empty Carcase |
I did the glue up of the carcase alone. I used run of the mill Titebond wood glue to join the dovetails at the bottom of the chest. I had some difficulty getting the shelves into their dadoes and the glue was pretty well set up by the time the clamps were on. The carcase was out of square so I forced it square and nailed a cross brace across the back. The shelves are only nailed in from the outside with no glue.
The carcase settled in slightly out of square (about a quarter inch) when the clamps and cross brace came off. I did what I could to force it back to square when I screwed on the front plate. The back consists of inexpensive home center carsiding because it is already tongued and grooved. I screwed and nailed on the carsiding level with the bottom of the chest. I left the sides protruding beyond the chest on both sides to account for being out of square. I then planed the end grain level with the chest side. I never planed nearly three feet of end grain before and found that it was not as easy as I'd hoped, but not as hard as I'd feared.
 |
| Full Chest |
Above is the full chest. The top is organized, but I just threw a bunch of stuff into the bottom to clear some space on the table. The personalization of this project is all on the inside, and then mostly in the top. Here is the top full of tools:
 |
| Organized Top Of Chest |
A previous post stated that there would be two rows of tools in the tool rack. However, the plan changed when I finally started playing jigsaw puzzle with the planes. The space was designed from the bottom up. And I still ended up with a second tool rack. There are 12 tools in the rack at the top right of the photo; here is a close up:
 |
| Secondary Tool Rack |
However, I'm getting ahead of myself. The space was designed from the bottom. Painstaking tolerances were achieved for the planes by using circular calibration disks, washers for short.
 |
| Bare Bottom |
| Almost Done |
The strips of wood are all from the scrap pile. The left and right have a rounded over strip that the planes rest on to keep the blade off the bottom of the chest. David Charlesworth is always placing his planes similarly in his videos, thus I'm simply emulating a Master.
I often hear the reasoning for a plane kickstand is to keep the blade from getting dull; I believe the real reason is to isolate the cutting edge from a moisture retaining material (wood) to prevent rust.
Getting back on track. The wood strips are held down simply with glue. I used screws and weight to hold them down while the glue was setting. In the photo above the screws are coming out after the glue is set. The screws came out to minimize metal to metal contact. I ascribe to the philosophy that tools should always touch material softer than they are as much as possible; also, I hate sharpening.
Here is a close up photo that was just too cool not to post:
 |
| Close Up Of Tool Separators |
The tool organization is designed to merely prevent contact with surrounding tools during ingress and egress (put'em n take'em). This Dutch tool chest will not be traveling further than the basement shop and is not designed to protect during transport.
Here is a picture of my Lee Valley brass mallets in action:
 |
| Mallet Clamp (TM, Copyright, R, by me) |
 |
| Gravity At Work |
 |
| Miter Box To Start Till Kerf |
 |
| Saw To Finish Saw Kerf |
I made two custom brackets for the tool rack. The first holds a small square, the second a marking knife. They both started from a block of wood (doesn't all our stuff?) before joining the tool chest.
| Raw Knife Holder |
I like this shot of the mounted knife holder. I have a crappy camera, and worse skill when it comes to photography, so my standards are pretty low.

I will be building a second chest and a saw buck to complete my basement shop storage. My idea of a saw buck comes from Ron Herman of Antiquity Builders. It is a wood box that holds a complete set of handsaws. Unfortunately, I neither have, nor wrote down what Ron deems a complete set of hand saws. My box will be a simple rectangle about 28-30 inches tall, 10 or 11 inches wide and 7-8 inches deep with enough slots to hold 7 or so saws. Apologies in advance for half-assing Ron's design.
Here are a couple more pictures that I took of the chest.
 |
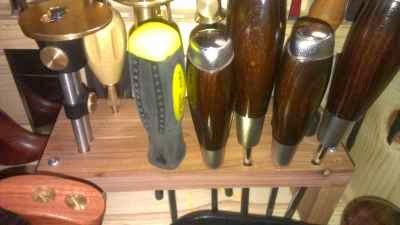
| Tool Rack Looking Left |
 |
| Tool Rack Looking Right |
I don't know why I didn't think of this to start, but I found (because Leigh told me I would) the needed clips in the proper quantities at McMaster-Carr. I don't know if you are acquainted with McMaster-Carr, but they are the type of operation that if a company starts making Splendiferous Widgets at 8am and you call McMaster at noon to buy them, by 3pm they will have photographs, SKU information, and a shipper tracking number for you. Here are the clips I purchased:
1 1723A21 Tool Holder, Zinc-Plated Steel, for 3/8" - 5/8" Tool Diameter, Packs of 10
2 1722A41 Tool Holder, Nickel-Plated Steel, for 3/16" - 3/8" Tool Diameter, Packs of 10
3 1722A42 Tool Holder, Nickel-Plated Steel, for 5/16" - 3/4" Tool Diameter, Packs of 10
Only one of the smallest clips were used in the tool chest (line item 1).
Again referring to the two photos above. On the left you see my three custom Grace screwdrivers and an inexpensive countersink driver that the origin of which I don't remember. The right side features most of my set of Grace woodworking screwdrivers. I fit seven of the 8 Grace woodworking drivers in the tool chest. The tallest, for #14 screws, would not fit by just a smidgen. I could modify the wood handle to make it fit, but I really like the way Grace drivers feel in my palm and don't want to risk losing that feel.
The spacing for the clips is all by eye. I mounted examples of each purchased clip on a piece of scrap. From there I tested which clip fit which tool the best. The last step was to fill the chest up and eyeball what fit where on the sides and screw in the clip.
The last post on the construction of this chest will come when I finally get the hardware for the top. I'll probably have the second one built before that happens!